Vietnam has become an increasingly popular destination for international travelers, with its vibrant culture, stunning landscapes, and historical sites. To accommodate the growing number of visitors, the Vietnamese government now offers an E-Visa, a convenient electronic visa for travelers from select countries. Vietnam Visa Express outlines everything you need to know about the E-Visa process on the official Vietnam Immigration Department as follows!
Preparing for your E-visa application on the Vietnam Immigration website
Required documents for the E-visa application
To streamline your application on the Vietnam Immigration Department website, it’s important to gather all necessary documentation. Here’s what you’ll need:
– Valid passport: Your passport should be valid for at least six months from your intended entry date into Vietnam. Ensure that your passport also has at least two blank pages available for stamps upon arrival.
– Digital passport photo: A digital passport-style photo is required for your application. The image should be recent, with a neutral expression and clear visibility of your facial features.

– Passport scan: You’ll need a digital scan of the main page of your passport, which includes your photo, full name, passport number, date of birth, and other essential details.
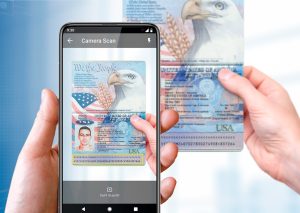
While gathering these documents, make sure the photos and scans are clear and meet the size and format specifications detailed on the Vietnam Immigration Department website. Any discrepancies may result in delays or the need to reapply.
Understanding fees and processing times for the Vietnam Immigration E-visa
Understanding the fee structure and processing times can help you plan accordingly. Here’s an overview:
– Application fee: The Vietnam E-visa fee is generally a fixed amount and is non-refundable, regardless of the outcome of your application. Payment options include major credit and debit cards, and it’s essential to ensure your payment method is approved for international transactions.
– Processing time: Processing typically takes 3 to 5 business days. However, it is strongly advised to apply at least a week before your intended travel date to account for any potential delays. Certain times of the year may experience higher application volumes, which can extend the processing period.
Familiarizing yourself with these details helps to ensure your application process goes smoothly, without unexpected hiccups.
Step-by-step application process for the Vietnam Immigration E-visa
Accessing the Vietnam Immigration Department website
1. Navigate to the official website
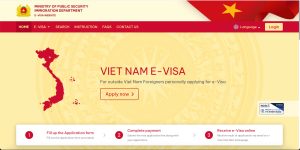
The most updated vietnam immigration website (since November 11, 2024).
Start by going to the official Vietnam Immigration Department website. Be cautious, as there are numerous unofficial sites posing as official E-Visa providers. Only use the official government website to avoid scams or additional fees.
2. Find the E-visa portal
On the homepage, locate the “E-Visa” section, typically listed under the “Services” or “Visa” tab. This portal will provide direct access to the application form, FAQs, and official resources for applicants.
Filling out the E-Visa application form
Once in the E-Visa section, you’ll be prompted to complete an online application form:
1. Choose your nationality
Begin by selecting your nationality from a dropdown list. Only nationals of specific countries are eligible for the Vietnam E-Visa, so make sure your country is listed.
2. Provide personal information

Enter your full name, date of birth, passport number, and other personal details as required. Double-check all information to ensure it matches your passport exactly; even minor errors could result in delays or rejection of your application.
3. Enter travel information
Input your intended entry and exit points within Vietnam, including planned arrival and departure dates, and provide the address of your accommodation (such as a hotel booking confirmation). Accurate travel details help authorities verify your itinerary.
After completing each field, take a moment to review your entries. Errors or omissions can delay the process and may lead to application denial, requiring a new submission.
Payment process for your E-visa application
Once you’ve completed and reviewed your application, you’ll be directed to the payment section:
1. Verify payment amount
Confirm the E-Visa application fee total displayed on the payment page. Note that all fees are non-refundable, so double-check all information before proceeding.
2. Select payment method

The Vietnam Immigration Department website typically accepts major credit and debit cards, such as Visa and Mastercard. Make sure that your card is approved for international transactions.
3. Complete the payment
After entering your card details, submit the payment. Upon successful payment, you should receive a confirmation email with an application reference number. This number is essential for tracking your E-Visa status, so keep it safe.
Final steps and receiving your E-visa from Immigration Vietnam Gov
After completing your application and payment, you’re ready to monitor your E-Visa status. The final steps involve checking the application progress and downloading your E-Visa upon approval.
Checking the status of your E-visa application
1. Track your application
To monitor your application, go to the “Check Application Status” section on the Vietnam Immigration Department website.
2. Enter your reference number
Use the application reference number from your confirmation email. The status may indicate whether the application is still being processed, has been approved, or has been denied.
3. Time to check
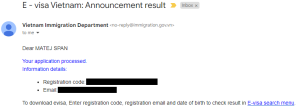
Vietnam E-visa result via email.
Wait a few days before checking, as processing typically takes 3 to 5 business days. In case of an unexpected delay, allow additional time and check your email for any notifications from the immigration department.
Downloading and printing your E-visa for travel
1. Download the approved E-visa
Once the E-Visa is approved, you’ll see a download option on the website. Download the digital E-Visa, which includes your details and an official barcode for entry.
2. Print your E-visa
Print at least two copies of your E-Visa. You’ll need one for presentation at immigration when you arrive in Vietnam, and keeping a backup is a good idea in case of loss or damage during travel.
Additional tips for a smooth Vietnam E-visa experience
Before concluding, here are some additional tips to ensure your E-Visa application process goes as smoothly as possible:
– Apply early: Applying at least two weeks before your travel date is ideal, as it provides a buffer in case of processing delays.
– Double-check information: Accuracy is crucial at every step. Ensure all entries match your passport exactly to avoid delays.
– Know your entry and exit points: Vietnam has specific points of entry where E-Visas are accepted, so check that your intended entry point is compatible.
– Keep your E-visa on hand: Print multiple copies and keep your E-Visa in an accessible place while traveling, as you’ll need to show it at immigration upon entry.
By following this guide, travelers can confidently navigate the E-Visa application process for Vietnam. This E-visa option offers a fast, convenient way for eligible tourists and business travelers to enter Vietnam, providing easy access to the country’s vibrant cities, scenic landscapes, and cultural landmarks. For the most current information and any changes in policy, it’s recommended to refer to the Vietnam Immigration Department website before applying. If you are looking for a reputable visa agency to help you obtain your E-visa, consider Vietnam Visa Express with cost-saving service, simple process and the most supported staff.

